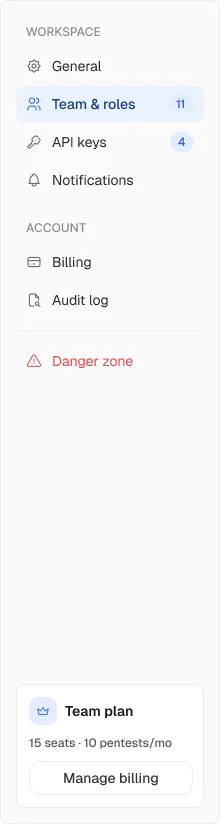
Live preview from the React code. Hover the marks, rows and tabs.
Build it with your agent
Copy the setup prompt once per project, then the prompt for this component. Works with Claude Code, Cursor, VS Code and Codex through the Ingot MCP.
1Set up Ingot UI
Set up Ingot UI in this project.

1. Connect the Ingot UI MCP server by running:
   claude mcp add --scope user --transport http ingot-ui https://mcp.ingotui.com/mcp --header "Authorization: Bearer YOUR_API_KEY"
   Replace YOUR_API_KEY with my key from https://ingotui.com/account (ask me for it if you don't have it).
2. Call the Ingot UI tool init_project for the Abotix system and write every file it returns (token CSS, CLAUDE.md, AGENTS.md, .cursor/rules/ingot.mdc).
3. From now on build UI from Ingot components and the --fu-* tokens, never raw hex colours, and run audit_ui before you finish.
2Build this component
Add the Ingot UI "Settings nav" (forms, Abotix system) to this project.

Use the Ingot UI MCP: call get_component_code with slug "abotix-settings-nav-816671" and write the file to the path it returns. Then place it where I need it, keep my existing layout, use the --fu-* tokens for anything new, and run audit_ui when you're done.
Specs
Settings nav is 89 lines of React with 8 Ingot icons, set in Inter, Geist. It needs no packages beyond React, so it works in Next.js, Vite or Remix as pasted, and its colours can be swapped for your Abotix tokens.
- Component
<SettingsNav />- Size
- 220 × 824 px
- Icons
- Alert triangle, Bell, Credit card, Crown, File search, Key, Settings, Users from Ingot Icons
- Type
- Inter, Geist, 12px, 14px, Regular and Medium and Semibold
- Colours
- #5c5c5c#2b2b2b#ececec#8a8a8a#2563eb#e3ecff
- Corner radius
- 8px, 10px, 12px
- Code
- 89 lines of TypeScript, React only, inline styles, icons included
Use it
import { SettingsNav } from "./settings-nav";

export default function Page() {
  return <SettingsNav />;
}
Accessibility
Notes for all forms components (category level). Target: WCAG 2.2 AA.
- Keyboard
- Every field reachable with Tab, in visual order; Enter submits.
- ARIA
- Native <input>, <select> and <textarea> with a visible <label>; aria-invalid and aria-describedby for errors and hints; toggles as role="switch".
- Focus
- A visible focus ring on every field and button.
Before you ship it
- The generated code draws the design only: <div>s, text and aria-hidden icons, with no buttons, inputs, roles or ARIA. That is why it matches Figma closely, and why you add behaviour when you wire it up.
- Replace the drawn fields with real inputs (the free Loopo Input, Select, Switch and Checkbox are built this way).
- Don’t rely on placeholder text as the label.
How we test and what’s known: accessibility statement.